
1s selection of the default workplace. Workplace for 1C:Enterprise support. Reporting errors

This article describes approaches to automating the cashier’s workplace using the 1C: Retail program.
In the sales process, various trade equipment is used: electronic scales, barcode scanners, cash registers, etc.
Cash registers (or cash registers) are used in certain operating modes:
1. Fiscal registrar mode.
In this mode, the cash register is connected directly to the user’s personal computer. To speed up the sales process, employees use modern equipment: electronic scales, barcode scanners, etc. For ease of use, the cashier’s interface is displayed on the desktop, and in the information base, when a check is entered on a cash register, a new document “KKM Receipt” is automatically registered.2. Offline mode.
In this mode, all available information about the product is stored in the memory device of the cash register. Sales are registered using an individual product code, and the user reads the product using a barcode scanner or enters the code on the cash register keyboard. When summing up the results of the trading day or at the end of the work shift, sales data is uploaded into the accounting program.3. Online mode.
In this mode, all product data is read by the cash register from the program. The cash register generates sales information, which is immediately transferred to the accounting program. There is no time to load any data into the cash register, since the information is taken automatically from the accounting program. As a result, only completely reliable information on completed sales is recorded and stored in the accounting program, which is available for processing and analysis.
Cashier's workplace.
The operation of a cash register in fiscal registrar mode involves the use of a special interface called “Cashier Workplace”.
This interface can work without a keyboard and mouse (using touch-screen monitors).
Using the “Cashier Workplace” interface opens up a lot of possibilities:
- setting up a workplace for a cashier;
- search for product name by text representation;
- interaction with commercial equipment:
- acquiring systems;
- buyer display;
- programmable salesperson keyboard;
- Barcode Scanner;
- fiscal registrar;
- credit card reader;
- selection of goods (display of residual price);
- selection of interface modes:
- food retail;
- non-food retail;
- search for goods by article, code, barcode;
- automated completion of return documentation on the day of sale and later.
This interface option assumes that the cashier uses a mouse and keyboard to enter data when registering sales.
Cashier workplace and retail sales.
The cash information window is located at the top of the interface. It displays information about the current sale: the amount of the discount on the product, the total amount taking into account the discount provided, the amount to be paid minus the discount.
The main window contains information about the products currently on sale. Typically it displays: the percentage and type of discount, quantity of goods, item, price and total amount of payment with a discount.
You can manage the process of selling goods using the function keys of your PC keyboard.
Registration of sales is carried out by scanning the barcode of the product or adding information manually using the selection button. After registration, the item will appear in the main window, after which you need to set a discount (if any) and click on the “Payment” button.
Interface "Food retail".
When using this interface, data is entered without using a mouse, only from the keyboard.
On the right side of the proposed interface, some buttons may be displayed as a hint for convenient pressing from a cashier’s programmable keyboard, computer keyboard, mouse or touch-screen monitor. Accordingly, each button that performs certain functions is assigned specific keys on the keyboard.
Cashier workplace and retail sales.
Sequence of cashier actions:
- reading the barcode of the product being sold from the label;
- if the barcode cannot be read, the cashier types the sequence of digits of the barcode and then selects the “Search by barcode” function either by pressing a key or in the monitor interface.
- If the barcode is missing again, the cashier must press the “Selection” key, search by product category and, when the product is found in the database, press the Enter key.
- if the quantity of a product is greater than one, you need to use the keyboard (or a programmable keyboard) to set the required quantity in the product line.
- if it is allowed to change the price for an item, and such a change is required, then the cashier needs to use the numeric keypad (or programmable keyboard) to set the required price value. The item line will reflect the change in price.
- If you need to set a discount on a particular item of the selected product, you need to enter the discount value (percentage) and press the special button for setting the discount amount.
- If the buyer refuses the product, you must find the required product line in the product table and delete it by pressing the product line delete key.
Payment of the check by the buyer.
First of all, the payment window shows the amount received in cash from the buyer. The program will immediately calculate the amount of change.
When the buyer presents a payment card, it must be scanned with a magnetic card reader or by entering information on the card, select the desired option from the list of payment cards available for payment.
There is an application solution that provides for the situation of partial payment on credit (or full payment).
Closing the cash register shift.
The operation “Closing a cash register shift” is executed based on the entered cash register receipts, and based on the results of the sale and return of goods, the “Retail Sales Report” document is created.
Get additional advice on
This article provides recommendations (a kind of tutorial) on how to correctly and, therefore, set up the cashier’s workstation (WWK) as quickly as possible - a functional block of the 1C Retail software product (release 2.2.6.33 dated 08/31/2017), developed on the 1C:Enterprise platform.
Since the solution itself is designed to automate the operation of a retail outlet with any throughput, the functionality that ensures the operation of the cash register complex, which may include, for example, weighing equipment, can be considered the main one. That is why the work of setting up the program in this part is simply called “setting up a 1C store.”
The RMK software module has comprehensive functionality for the effective operation of a cash point in a retail space of any capacity. Access to the module’s tools with the ability to use certain functions by a specific cashier is set in the general settings of 1C Retail in combination with the personal rights of a specific employee.
Setting up commercial equipment
Let's start setting up a 1C store in general and RMK in particular with such an important component of trade as retail equipment. It’s hard to imagine stores without electronic cash registers, and yet less than 30 years have passed since their mass distribution. The ability to connect fiscal registrars to the information system simplified the process of not only servicing customers, but also obtaining reports while increasing the accuracy of the data and their correspondence to reality.
You can configure the operation of the equipment by going to “Administration” - “Connected equipment”. Having checked the “Use connected equipment” checkbox, move to the “Connected equipment” menu item, which is located on the right.
In the 1C Retail 2.2 window that opens, select “Fiscal registrars” - “Create”.


After “Record and close” our recorder appeared in the list of equipment.

Having selected it in the list, click “Configure”. If the hardware driver is not installed, the program will report this and offer to install it.

After the “Install driver” command, the program will install it and open the hardware settings window.

Here you should conduct a “Device Test”. Its results will be displayed in a message, and if everything went well, the equipment will be successfully connected. Finally, select “Record and close”.
Setting up a 1C store can be done in the context of food retail and non-food retail, but regardless of this, it is important to set up user rights, since this is what will ensure control of the correct work of staff with inventory and, of course, in terms of settlements with customers.
Go to “Administration” - “Users and Rights” - “Personal User Settings” - “Additional User Rights”.


It would be more correct to assign the first user, if he has not been created, as an administrator. Check all the boxes and click “Record”.
For reporting and generation of the correct fiscal document (check), it is necessary to enter the details of the trading enterprise in “NSI” - “Organization details”.

We fill in all the necessary information and save the data.

Next, we create a store from which sales will be made in “NSI” - “Stores” - “Create”. We enter into the system the name of the store itself, the name of the warehouse from which shipment will be made, the organization from which sales will be made and pricing rules.
Let's look at the latter in more detail.
In order to create a new rule, click the select button from the list (down arrow on the right). You will be automatically offered to select a rule from the list or the option to create a new one (green plus). Since we are setting up a new database from scratch, the list will be empty, and we will have to “create a new” rule. Enter the name of the rule and create a price type. To do this, just as before, click “Select from list” and in the window that appears, click “Create”. The price type creation window will open.

Let's start by creating the “Purchase” price type. It will not be used for sale, so we do not tick the corresponding box. You can fill it out manually or automatically by substituting a value from the infobase. In the example, we select the option “Fill in according to information security data upon admission.” Data composition scheme: “Receipt prices” (in this case, prices will be filled in from the receipt document). Click “Save and close”. Our manipulations had no effect on the “Types of Prices” window, and the price we just created did not appear. This happened because the “Use when selling” checkbox was not checked.
By clicking “Create” again, we will now work with the “Retail” price type. Check the “Use when selling” checkbox and select the “calculate using other types of prices” method for setting the price. In the same window, just below, a formula constructor will appear, with which you can set up automatic price calculation using a given formula.

In the example, we created a markup of 30% of the purchase price by clicking “Record and close.” Only after these steps did our retail price appear in the list of price types. And by clicking “Select” we confirmed the need for our price to be added to the pricing rule.

Repeat “Record and close” two times. The store creation setup has been completed successfully.

To “create”, that is, set up a cash register, go to the “RSI” - “Cashier” section. Click “Create” and select the store we created earlier. Select the name of the cash register and check the box “punch receipts at the cash register cash register.” We haven’t created a cash register yet, so we create it using the selection button on the right, ask “show all”, then “Create”.


In the connected equipment, select the fiscal registrar, set the name, indicate the serial and registration numbers. Finally, click “Save and close”.

Select the created cash register from the list and click “record and close” again.
At this point, we have finished setting up the details necessary to launch the cashier’s workstation (CWK).
Creating documents
Let's start with the receipt of goods in the "Purchases" - "Receipts of goods" section and create a new document.
In the document itself, it is possible to create a new supplier by writing down the name of the supplier company and all the necessary details. We can fill out the document nomenclature table, as with the supplier, by creating new nomenclature items directly from the document being created. We indicate the name of the product, type of item, VAT rate and unit of measurement. As a result, we get a document that looks like this:

Click the “Post” button (document with a green arrow), and then “Create based on” (two documents with green arrows). In the drop-down menu, select “Set item prices.”

“Set item prices” will open.

The program automatically calculated the retail price using the formula we set. The purchase price is recorded in the “Receipt” document. Click “Swipe and close”.
For the sake of experiment, let's go in and check the remaining goods in the warehouses. To do this, in the main menu, go to the “Warehouse” - “Warehouse reports” - “Warehouse balances” - “Generate” section.

We see that the goods have arrived and are listed in the warehouse balances.
Sale of goods
We proceed directly to the sale of goods. To do this, go to “Sales” - “RMK (managed mode)”.
Before us is the RMK menu - what the cashier will see in front of him. To start work, you need to open a shift. Click the “Open shift” button, which will print a check for opening a shift.


The program will punch the check.


“Changing RMK settings” and “Create”.

In the window that opens, select the necessary settings: on the first tab, set the flags opposite the items “Merge positions with the same product”, “Use advanced settings for bottom panel buttons” and “Open the bottom panel at startup”. On the second tab, we select which buttons will be present on the bottom panel (here you can select an arbitrary number of buttons).
Please note that in the “Maximum number of buttons in one row” box there should be a number other than 0, because this can cause various errors to occur when working with the RMC.

Having configured the buttons on the bottom panel, click “Record and close”. Now, having opened the “Sales Registration” section, we see that a bottom panel has appeared with the buttons that we selected in the settings.

To close a cash register shift, click “Close shift”. The program will ask you to confirm the closure. By clicking “Yes”, we will receive reporting information on sales for the past shift.

Click the “Close shift” button. The program will print the closing receipt and generate a report on retail sales.

At this point, the quick setup of a 1C Retail store is complete, and you can work with it. Of course, there are many more settings in the program, but for a quick start, the ones discussed are quite enough, and the rest can be added as you go.
Good luck with your sales!
Home 1C: Retail 8 Sales managementCashier Workplace Settings
When using the RMK mode, it is possible to change user rights without exiting the program. For example, to register a withdrawal of funds by a senior cashier, it is enough to read the code of his service card to activate the withdrawal function. The limitation of the cashier's functionality when working in the RMK is determined by a combination of the general settings of the RMK interface and personal additional user rights.
The program provides two pre-made RMK settings: for a grocery store and a non-food store. However, the system administrator can create the required number of settings that take into account the specifics of different stores.
The RMK interface settings are located on three pages: General settings,Fast goods And Bottom panel settings.
General RMK settings control the behavior of the program when registering retail sales in general. For example, general settings determine the ability to enter an arbitrary price value if the sale price has not been assigned, printing documents when returning, conducting a customer survey, as well as the behavior of some forms.
On the page Fast goods You can configure hotkeys for products that are sold quite often, but do not have an industrial barcode. You can display an image of the product on the buttons on the quick product panel in the RMK.
Setting up the bottom panel consists of selecting the commands required for operation from a list of 26 preset commands. Commands for registering personal sales and replacing user rights, withdrawing and depositing funds, managing pending checks and reversing a check, working with discount cards and discounts, managing equipment connected to the cash register and printing documents are supported.
The user's personal settings determine access to configured operations in the RMK. The cashier can be given the opportunity to edit the fields of the tabular part of the check, register discount cards and conduct a survey, process returns, establish control over balances when issuing a check, and also be given the opportunity to use functions defined by the general settings of the cash register. Commands that are not available to an ordinary cashier are displayed on the screen, but become inactive.
The program implements the ability to set the procedure for rounding the amount of a check in favor of a buyer in a specific store. You can also assign a type of minimum selling prices. When automatically calculating discounts, the system will replace the discounted price with the lowest possible price if the discount is too large.
A large number of settings allow you to fine-tune the program at the checkout point, take into account the specific distribution of responsibilities of store employees and process sales at the highest possible speed.
The first step in setting up the 1C: Retail 2.2 program will be to create Organizations. To do this, go to point Regulatory Reference Information (RNI), in the navigation panel select Organization details.
In the window that opens, select Legal Entity or Individual Entrepreneur. After this, fill in the appropriate details: Name in the program, Abbreviated name, Full name, TIN and others. 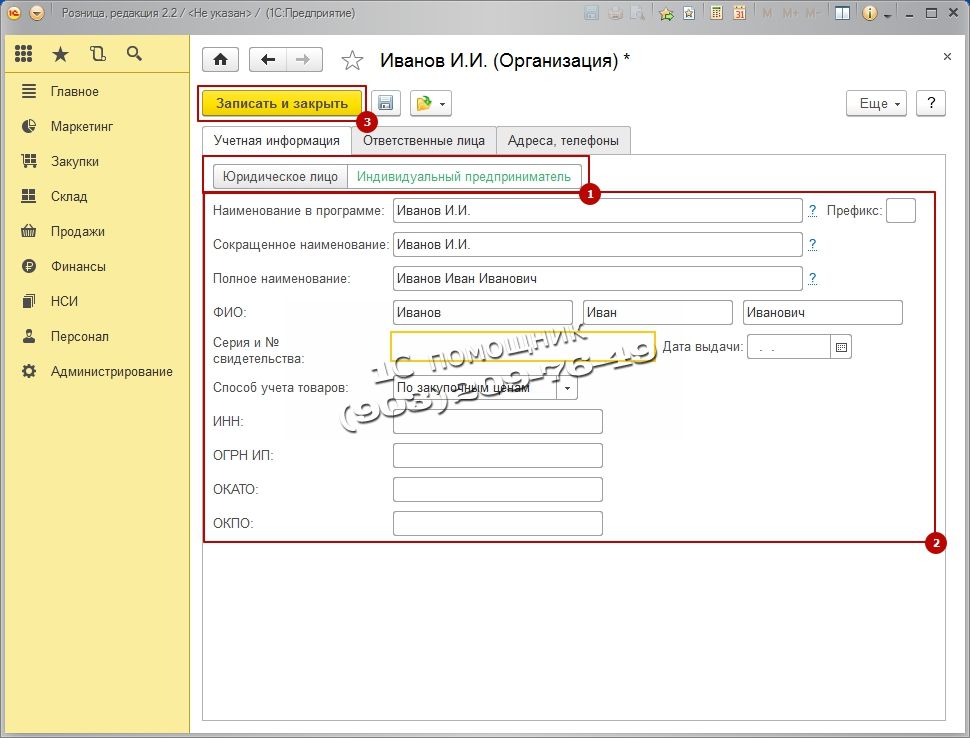
The next step is to create Types of prices. Go to the section Marketing, in the navigation panel select Types of prices and press the key Create.
We will need to create two types of prices: Purchasing And Retail.
First let's create Purchasing To do this, fill in the window that opens: Name, Method of setting the price and Data layout scheme. Purchasing the price will be filled in from the goods receipt document. 
After adding Purchase price need to be added Retail price, that is, the price at which we will sell. Fill in the new price: Name, Use when selling, Method of setting price and Calculation rules. In this case, we will receive an automatic price calculation, that is, Product Receipt Price + 50% markup = Retail Price. In the future, you can change the price manually. 
The next step is to create Pricing Rules, come in Marketing Pricing Rules and press Create.
In the window that opens, fill in Name And Type of prices.
Program 1C: Retail requires creation to work Store who will release the goods. Let's go to Regulatory Reference Information (RNI), in the navigation panel select The shops and press Create. 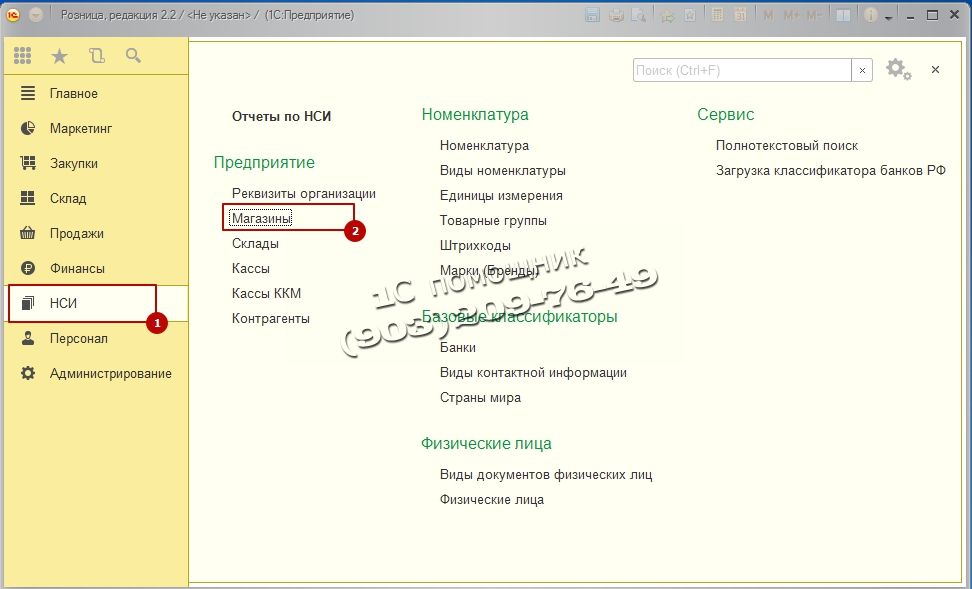
In the window that opens, fill in the basic details: Name, In the shop here you need to choose either to work with one warehouse or with several, Warehouse name, Sales organization this is the organization with which sales will be made, Pricing Rule, Type of minimum selling prices this is the same purchase price, it will be impossible to sell below this price, so as not to work at a loss, The procedure for rounding the check amount This item will allow you to round up the amount of the check, so as not to bother with pennies, if you think that you will already have equal prices and this is not required, then you are mistaken, because when you apply discounts, pennies will still appear in the item Rounding type choose Round the total This item will allow you to lose less money on rounding. After filling in all the details, click the button Save and close.
RMK (Cashier Workplace) cannot function without a Fiscal Registrar, so the next step is to add a fiscal registrar to the system. In our case we will add emulation of a fiscal registrar. Go to the section Administration, select in the navigation menu Connected equipment.
Next, check the box Use connected equipment and go to Connected equipment.
The equipment list is empty, add new equipment. Press the key Create.
Fill out the form that opens: Type of equipment select Fiscal registrars, Hardware Driver select 1C: Fiscal registrar (emulator), check the box Device in use, click on Record button an object and go to Tune…
If the device driver is not installed on the computer, click: Functions and choose Install the driver. If the driver is installed, then setting the check parameters will appear. They can be changed at your discretion or left as default. 
The next step is to configure KKM cash registers which will punch receipts in your Store. Go to the section Regulatory reference information (RNI), KKM cash registers and press Create.
Fill in the main points. Cash register type, Store, Name, Workplace, Connected equipment The Fiscal Registrar that we created earlier should appear in the field. Then presses Record and close.
Now we need to add rights to our user to use all the functions of the RMK. This point is very important. Let's go to Administration, Users and Rights and choose Additional user rights.  First, let's give the user all rights. Click on Button with green check mark and press Write it down. All necessary rights will be given to the user.
Next, we need to receive the goods into the warehouse; for this we need to create a document Receipt of goods. We take the data to fill out from the supplier’s invoice. Let's go Procurement, select the item Receipts of goods.

A list of all documents will appear Receipts of goods created earlier, in order to create a new document, click Create.
We will not consider in detail how the Goods Receipts document is created; this can be found in the article
To sell goods, we must have installed Retail prices for goods. To do this, after creating and filling out the Goods Receipts document, select Create based on next we choose Setting item prices.
The document will open. This document forms the Purchase and Retail prices. The program itself calculates the price based on the formula we set earlier. Purchasing equal to the receipt price of 50 rubles, and Retail equal Purchasing +50% markup amounted to 75 rubles. You can change the calculated prices manually; to do this, you need to double-click in the price field and then enter your price. To save the document, click Swipe and close.
So we have made the basic settings of the RMK, now we go directly to the Cashier’s Workplace. To do this, go to the section Sales and choose RMK (controlled mode).
The RMK panel opens, initially we need to Open shift, click Opening Shift, and then press Sales registration.
In the window that opens, click the button Menu(F10) When you click on it, the bottom menu will appear, then press the button Search (F11) to select a product from the list. 
In the window that opens Search and selection of goods in RMK Let's turn on the display of additional information on prices and balances. To do this, click the button below Show Information.
In the next window, select two checkboxes Show: Remainings and Prices. The current stock balances and retail price will appear at the bottom of the selection. 
Select the product with two mouse clicks and close the product selection window. In the RMK window, enter quantity of goods sold press the button Cash (F6) to make a sale, enter the amount of money deposited, the program will calculate the change and press the button Enter.

Your sales receipt will appear at the bottom right. If you are not using an Emulator, but a real fiscal registrar, then your fiscal registrar will print a Receipt.
After you have worked a working day, you need to close the shift. To do this, exit the RMK by pressing the key Exit(F12). The RMK launch window will open. Now we need to close the cash register shift. Press the button Closing a shift.
The program will ask for confirmation of closing the shift. If you are ready to close the shift, click Yes.
If everything is in order and the sales amounts for the day coincide with sales, press the button Closing a shift.
The cash register is closed. The program will display an information window about the cash register shift. If you are using a real fiscal recorder (not an emulator), it will print you Z-REPORT. 
First, you need to create a retail store in the 1C database, then connect the retail equipment and only then set up the retail store.
To create a store in 1C, go to the section Reference data and Administration, Further Warehouses and shops and create Retail store.

In the window that opens, fill in the empty fields.

To connect a cash register cash register to this store, you need to create it in the section Reference data and Administration → Cash register cash register. We will use the fiscal registrar cash register type, so we select it. You choose the type that you will use in your store. We also indicate our warehouse - the Electrical Goods Store.

For our store we now need to connect commercial equipment. You can configure it using a special processing called “Connecting and setting up maintenance”. Go to the section Reference data and Administration → RMC and equipment. Check the box next to "Use connected equipment" and then open the hyperlink "Connected equipment". In the window that opens, you need to create and configure the necessary retail equipment.


Now we can move on to setting up the cashier’s workplace itself. To do this, open the section Reference data and Administration → RMK and equipment → RMK settings.

In the window that opens, you must specify the cash register cash register and the connected equipment. You can also configure quick products and hot keys.

Before you start registering retail sales, you need to open a cash register shift. To do this, go to the section Sales → Cash register receipts → Opening a cash register shift.


Let's create a new check. Select a product from the product list and indicate its quantity. The price will be filled in automatically from the document Setting item prices. Next we move on to payment. The client can pay in cash if you have an acquiring terminal connected - from a card, or in both ways at the same time. Select the desired payment method and punch the receipt.
You can close a shift from the list of KKM receipts or on the RMK.

After closing a cash register shift, all receipts issued for the shift can be deleted, archived or left unchanged. When you click the Close Shift button, a Retail Sales Report is automatically generated.
Publications on the topic
-
 Yakutia is proud of them: a book about Vasily Pavlovich Zagainov
A book has been published dedicated to one of the experienced Komsomol, party and economic workers of Yakutia, Vasily Zagainov, who...
-
 Linnik - the meaning and origin of the surname From import to production
Last name. Has Ukrainian or Belarusian origin. In some cases, the bearers of such surnames were Jews living in the territory...