
DIY paper tank. Paper origami tank. Master class for beginners Candy tank

2. You should get an X-shaped fold at each end of the rectangle. Now you should form each corner so that you end up with a multi-layered triangle. To do this, you need to fold each of the two inner corners to the center of the letter X, bring the corners together and give them a little.
3. For the second end of the rectangle, repeat the same steps. This should be done from the “wrong side” so that as a result a two-sided arrow is formed, which has sharp ends, but these ends should be located in opposite planes to each other.
4. Bend the corners of the upper part of the “arrow” so that a rhombus is formed on one edge, which consists of two corners.
5. Unbend one of the corners on the opposite side so that it joins the bottom part, and bend its edge up. You will form a valve that should be bent in the opposite direction. Repeat the same action with the other corner. On this side, you will also form a diamond as a result.
6. Place the product towards you with the wide side, lift its side parts and insert one part into the other. An arc is formed with paper flaps fixed on top. The formed arc is your paper tank, at the top of which there is a real “tower”.
7. The tank is almost ready. It remains only to add caterpillars and a muzzle (cannon) to it. The missing parts are quite simple to make: bend the side edges of the tank and form caterpillars from them. For a paper muzzle, roll up the tube and insert it into the hole that is in the "tower" of the tank.
Now the paper tank is done!
Also watch the video on how you can make other tanks out of paper!

If you use the knowledge of creating paper tanks from this article, then you will definitely succeed. Successful creation of paper tanks!
Boys from an early age are interested in the topic of the army and technology. Drawings, crafts, toys are most often associated with just such a direction. It is especially interesting for a child to create their own crafts, color sets with thematic drawings, glue plastic models. Parents need to be prepared for such interests, because information on how to make a paper tank with your own hands will not be superfluous.
There are many step by step instructions. It all depends on the amount of free time and skills in needlework. Of course, it is best to involve a child in the process of creating crafts. That is why it is necessary to choose layouts that do not require a very long time to implement. Otherwise, the child will quickly lose interest. Besides, it is necessary to consider the availability of all materials.

Such a set of tools will be more than enough to create even the most complex tank model. All additional materials depend only on the imagination of the author. You can use small decorative buttons to decorate the tower or create realistic wheels on the tracks, paint the model with watercolors to make the camouflage as realistic as possible.
The best craft options
There are many options for creating a tank model. Some methods offer origami in its purest form, in which you can get a craft from a single sheet (or several sheets) of paper. The implementation of other layouts will require gluing and cutting, but the craft is most often more realistic.
Regardless of the method, it is necessary to approach the process creatively, think over different color schemes.
Volumetric paper tank
To create a volumetric tank, you will need scissors, glue, colored paper, a ruler and a pencil. The step by step process is as follows:


Since making a paper tank with your own hands in this way is not at all difficult, you can spend extra time decorating and coloring. For example, you can cut a small five-pointed army star from a sheet of red paper and place it in any place you like. Camouflage is chosen depending on taste preferences.
Model using origami
Using the origami technique implies a minimum number of auxiliary tools and an increased concentration of attention. In this case, you will have to carefully follow the instructions. It is far from always possible to get a beautiful and neat craft the first time, therefore, before starting the creation process with a child, it is worth practicing on your own. From materials and tools you will need a sheet of A4 paper and scissors. Any color can be chosen.

To simplify the work as much as possible, it is worth purchasing good quality sheets. The material should not be very dense or too thin.
Use of corrugated board
One of the most unusual ways to create a tank model is the use of corrugated cardboard. The unique method allows you to get a stunning effect. Crafts are very realistic and voluminous. Using a combination of different colors, you can bring the craft as close as possible to the original. To create a tank, you will need corrugated cardboard, glue and scissors. All work is done quickly enough and takes very little time:

Detailed instructions on how to make a tank with your own hands from corrugated cardboard may be subject to change. During work, it is worth considering the wishes of the baby.
The benefits of self-employment
Creation of tank models has not only an entertaining component. From such hobbies, you can derive very specific benefits for the child and the whole family as a whole:
- development of hand motor skills while working with various parts;
- increasing the level of concentration of attention, which is achieved due to the need to follow the instructions;
- improving intelligence, as some crafts require spatial thinking;
- family cohesion: it is very important for a child when crafts are made in a warm, family atmosphere.
When making models, you need to constantly talk with the young craftsman, find out his wishes, ask what color or shape of the details would be preferable. At the initial stage, it is best to give the baby easy assignments that he can handle without much difficulty. Time costs should also be taken into account. It is difficult for a child to sit in one place for an hour, so it is better to use layouts where you can get a visible result in a short period of time.
Creating paper tanks may be of interest not only to boys, but also to girls. Firstly, such figures will be great toys for them. Secondly, the very process of creating a figurine arouses unprecedented interest in children, develops motor skills. And thirdly, many parents, during the process of forming such figures, tell their children about the great wars and their features, involving the kids in the history of their state. So, how to make a tank out of paper and where to find the layout and drawing?
Creating paper tanks may be of interest not only to boys, but also to girls
The T 34 paper tank corresponding to the real car can be glued together using ready-made reamers. To do this, you first need to print the necessary scan on thick paper. Then you should cut out all the drawn details.

 To make T 34 from a sweep, you must follow the instructions:
- Fold lines should be found on the cut elements. A ruler is applied to each of them, and then the free edge of the paper is lifted and ironed. This results in an even fold.
- After all the folds are marked, you can proceed to gluing the model.
- The first step is to glue the main body of the tank. To do this, it is advisable to use transparent acrylic glue or quick-drying PVA.
- Then all secondary parts are glued to the body.
- Next, you can move on to the gun. First of all, its base is glued together, and only after that the cannon is supplemented with secondary elements. The finished model is glued to the main body of the combat vehicle.
- After that, the caterpillars are assembled. First, the inner circles are made, and only after that they are framed by a single caterpillar strip. Finished caterpillars are attached to the sides of the hull.


It is worth considering that there are various scans of the T 34 tank, which may differ from each other in color and conventionality. If you can only print a black and white version of the car, you should paint it using acrylic paints before assembling it. Such processing of cardboard will allow the future toy to acquire the appearance of a tank with a natural coating.
Gallery: paper tank (25 photos)


Tank IS 7 made of paper
To make this tank, you should also use the finished scan.


- All elements of the sweep are cut with a clerical knife.
- Next, using a ruler, folds are made at all places marked for this purpose.
- A support structure for the body is being prepared. It is made of two rectangles installed parallel to each other and fixed with 3 transverse strips located at an equal distance from each other.
- A body with a circle cut out in it is glued onto the resulting base.
- The body is glued on the sides, niches for the caterpillar are formed. The tank bottom is being formed.
- The basis for the cannon installation is being made. It is done in the same way as for the case. A manufactured tower is installed on the hull. A machine gun and additional elements are glued to the tower.
- Next, tracks are made: middle ones are smooth, rear tracks are with teeth.
- Tracks are glued to the bottom of the main body, fastened with a caterpillar track.
This model is quite difficult to assemble, so when creating it with children, it is necessary to provide them with extensive assistance. When assembling it with children, you can abandon several small parts, thereby simplifying the gluing process.
How to make a T 90 tank out of paper?
T 90 can be made using the origami technique. To do this, you only need paper: an A4 sheet and a small piece of paper for notes.

T 90 can be made using the origami technique
How to do:
- First, an A4 sheet is folded. First of all, he bends in half lengthwise.
- The perpendicular sides of the sheet are bent, connecting with each other. First, the short side is applied to the bottom long, and then to the top. Similar manipulations should be performed on both sides of the sheet.
- The sheet is turned over. The corners of the short side are bent to the ends of the crosses formed from the fold line.
- The sheet is turned over and folded along the lines obtained, forming the basic shape of a double triangle.
- The long sides are folded towards the middle so that the resulting double triangles are on top of them. The result is a double arrow.
- The newly folded edges are folded over to the outer sides of the rectangle.
- The side corners of one of the triangles are bent to the top.
- The workpiece is turned over and conditionally divided into 3 parts so that, as a result, the top of the folded triangle touches the middle of the base of the opened one.
- The free corners of the triangle bend inward.
- The "ears" from the previously bent triangle are set into the resulting pockets.
- The result is a tower.
- A small sheet of paper is folded into a cylindrical barrel using a knitting needle or a culinary skewer.
- The barrel is inserted into the hole in the tower and glued.
The figure assembled in this way can be decorated using thick paints, felt-tip pens or pencils.
How to make a tank from origami modules?
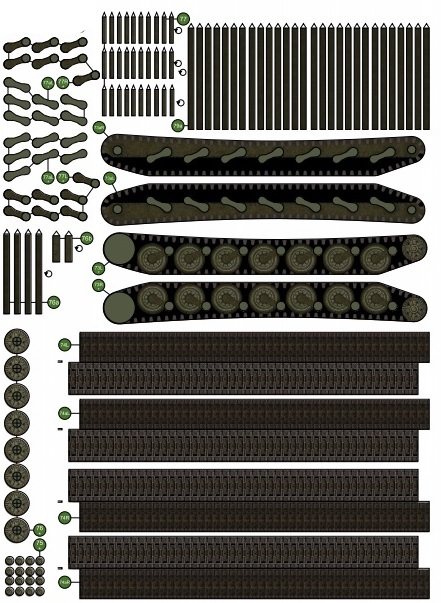
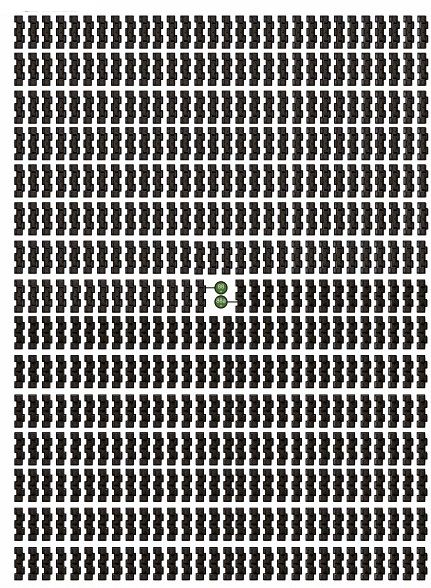
To create tanks, you can use the assembly scheme, which offers a modular origami. To begin with, the assembler will need to prepare 1688 triangular modules.
How to assemble:
- The first thing is going to the tower. Her first and second row are closed in a circle. Each row consists of 30 modules.
- The workpiece is turned inside out, supplemented by a third layer consisting of a similar number of elements. In this way, the tower is built up to 8 layers.
- The ninth row is assembled from 30 modules, but they should be installed backwards.
- Next, you need to proceed to the tracks. A chain of 4 rows is made, each of which has 50 modules.
- On the fifth row, 46 elements are used. The reduction should be carried out in places where the caterpillar is bent.
- 7 row consists of 46 elements installed back to front.
- The same scheme is used to create the second caterpillar.
- For each caterpillar, 3 wheels are made. To do this, a circle is made of 2 rows, each of which involves 10 modules. The figure is turned inside out and completed with 5 rows.
- The wheels are placed inside the caterpillar. These elements are connected by a middle bar made of 34 rows: 1 - 5 modules, 2 - 4 elements. Then the rows alternate.
- A slightly bent part is inserted between the tracks.
- A tower is placed on top.
- The cannon is made of 20 rows, the width of which alternates: 1 row - 2 elements, 2 row - 1. The last three rows increase to 4, 3 and 4 elements.
- The machine gun is inserted into the tower.

From paper.
On the eve of the holidays on February 23 and May 9, I want to give you a selection of paper tanks. And most importantly, how to make them yourself.
Also in the article you will find diagrams for origami and templates for cutting and gluing models. There will be, like modern models of combat vehicles, and the times of the first and second world wars.
In general, not all of the proposed ideas are simple. However, there are some that a child attending kindergarten can do.
Bookmark the article so as not to lose it, because at school and kindergarten they will definitely ask you to do crafts, so let the ideas be at your fingertips.
Let's start with simple ideas. Schoolchildren can already create them by repeating the steps in the master classes. however, young children will need adult help.
Master class number 1.

For this craft, you need to take 3 matchboxes, 2 sheets of double-sided green paper, a green bottle cap and a lollipop stick, tapes of black and red self-adhesive sheets.
We take a sheet of paper. We put two cardboard boxes on one and measure the length and width. We remove the boxes, and 1 cm allowances retreat from the marked lines. Then cut out the wrapper.
Ask your parents to put a lollipop stick in the lid.


We glue the matchboxes with the resulting blanks of wrappers. Two will go to the longest, and one to the shortest.

We cut out the caterpillars, slightly wider than the side narrow sides of the matchboxes.
Cut out 6 circles from black paper and stick them on the caterpillars.
From a red sheet we get a star to decorate crafts.
Master class number 2.
An option when you need to take one matchbox and a slightly larger box as a basis.
Also, as in the previous version, you need to wrap the boxes with green paper. Glue them on top of each other.
As caterpillars, take stiffening ribs from a cardboard box or dark-colored corrugated paper.
For the muzzle, take a stick from a chupik or a lollipop. We wrap it with a green strip and insert it into the cab. It is fashionable to make a hole for the muzzle, or you can fix it with a thermal gun.

Master class number 3.
Another idea of three matchboxes, buttons and paper.

Glue one box first. Then two. It turns out two blanks: one is smaller than the other.


We impose a smaller workpiece on a large one and fix it with glue.

Along the edges with glue, buttons of the same size.

We take the lid from the soda and with a hot awl we make a hole in it, into which we insert a candy stick.

Along the edges we imitate caterpillars with black paper.

Master class number 4.
A very simple tank idea. The main thing is to carefully repeat all the steps in the photo instructions.

From double-sided paper, cut out two strips 20 cm long, 2 cm wide.

We glue them into rings.

We measure a paper piece with dimensions of 12 * 7 cm. From two edges we mark 0.5 cm each. Then from this line 2.5 cm.


Now those lines with a width of 0.5 cm need to be bent away from you with a ruler. We bend in turn all the lines alternately changing the side of the fold.

We make a second similar detail of a smaller size 8 * 5 cm

Let's make a barrel.

You need to take a segment with dimensions of 4-8 cm. And mark the lines in length through each centimeter. 


We bend it and glue it to the cabin - a smaller part.

We take a large part and glue the cabin on it, turning the allowances inward.

We take our "rings" and flatten them a little with our hands to get an oval. Glue the caterpillars in place.

It remains only to decorate the craft.
Master class number 5.
The simplest craft for the little ones.

Cut out similar details and invite the child to stick the blanks in the right places.

Master class number 6.
An option for those who like to bother. Here everything is more realistic than in the previous version.

Put together 4 empty matchboxes. This will be the base of the tank.

Let's take one more box to the cab. Cover them with colored paper.

We pierce the cabin with an awl or a knitting needle and insert the muzzle.

Make a hole in the middle with an awl. It is necessary for us to make a rotating cabin.

For the muzzle, you can take any thin stick. For example, from a lollipop or a skewer for kebabs. Scissors can enlarge the hole if the tube does not fit.

We take the lid and make a hole in it with a hot awl.
Now we need a rod. It must be heated over fire and cooled against metal. This is necessary so that a plug is baked at the end. She will hold all our details together. This work should be done by adults! The child may get burned!

We pass the rod through the cab and the cover.

We pass it through the base with caterpillars.

Cut out five strips with a width of 1.5 cm from dark-colored paper. We make an “accordion” out of 4 and stick them in place of the tracks. From the rest, cut out the circles and stick them on the end of the base.
Master class number 7.
Option from paper and bushings. Very easy and quick craft. However, it looks very good!

We paint the upper edges of the bushings in a dark color.

Tape them together with masking tape.

We take thick paper and decorate the place of adhesive tape.

We measure two strips of silver corrugated cardboard, 2 cm wide and length corresponding to the width of the tracks. Glue the cardboard to the right places on the sides.

From thick paper we fold a box without side walls.

We decorate everything with the same color of the sheet.

We collect the details in one craft.

We will make a barrel from a straw for cocktails. Let's wrap it.

We make a hole in the cabin, and check that the tube enters it and does not fall out.

We insert the muzzle and decorate the tank.

Master class number 8.
Another simple and easy idea for kids.

Here is a diagram with dimensions. Transfer it to A4 sheet and cut out all the details. Bend all the blanks along the fold line.

Such parts of the caterpillar need two things.

Glue black circles on the front. Bent allowances go for gluing with other parts of the craft.

Glue the ends of the tracks with black stripes. Here's what happens.

We take the rectangle of the base and glue it, connecting the finished parts of the tank.

This is what it looks like from the front side.

They cut out the cabin and rolled it along the indicated lines, alternating the side of the fold. 
We make a hole in it and decorate the back of the cabin with a star.
Glue it to the base.

We turn the barrel and insert it into the hole.

The craft is ready. You can make an imitation of the Eternal Flame to it or add orders. You will find the layout of the order at the end of this article.
Origami paper tank - step by step instructions for beginners
Now a section for those who love the origami technique. Before you will be 5 detailed step-by-step diagrams.
And we will start with this option called "Abrams".

We take a spread of the notebook. Collectively, this is an A4 size. Fold it along the fold, then in half and cut. We bend one of the parts to the middle diagonally. We bend the part along the marked lines so that a triangle is obtained from the edge, as in the photo.


It turns out such a model.

Another version of the hand-folded tank.


Another diagram with detailed steps and indicated lines.

A variant of the simplest origami product.

A diagram for those who are just starting to learn the basics of this technique. The craft is made from one sheet.

Owning this technique turns out such beauty.


These variants of tanks can also be used for gifts and crafts for themed holidays.
Cardboard master class
Paper cardboard allows you to make durable crafts. They will not bend as quickly as the previous ones. And you can even play with them.
Here are two master classes.
First option.

You need to take corrugated cardboard, it is sold in any stationery store. Or remove the top layer from the cardboard box, exposing the stiffeners.
We make round rolls from thin strips.

We connect them with a rectangular base.

We twist the cabin on top.

We make a muzzle and decorate the craft with flags.

Such beauty is made of cardboard.


Option 2.


Ribbons of blue color will go to the wheels, rollers, cab and decoration. Green - on the caterpillars themselves.

We roll up the caterpillars from 4 spherical rolls. We take two strips of the same size. The next two need to be taken three centimeters less.

We tie them with a ribbon to fasten the rolls.

We make the basis for the cab and tracks.

So that they do not turn around, we glue them with PVA glue.

We do the rest of the details.

Entire compositions are created and sent to exhibitions.

I also suggest watching a video that shows the creation of a tank step by step.
All models can be modified to your liking.
Tank ideas that shoot
And now you have three ideas of cars that are fixed at the stage of shots. Of course, these are comic models of children's creativity. A pom-pom made of red threads, tinsel or toothpicks can “fly” from the muzzle.

As we can see, circles and hearts of red paper were glued onto the toothpicks, which imitates the speed and speed of the shot.

Such a fun idea with hearts.

Pay attention to the crafts themselves. They can inspire you to create wonderful compositions.
Tanks that can be printed, cut, glued
Now you will have a lot of cutting patterns in front of you. They need to be printed on thick paper or photo paper. Then cut out all the details along the contours and glue them.

The whole composition: a tank on a pedestal.

The following diagram with assembly instructions.

The following sketch is simple and it will be quick to assemble it.

Paper tank T-34
When assembled, it looks like this.

These charts need to be printed.


Now a detailed assembly diagram.


Tank T-90
For the T-90, this scheme is suitable.


Assembly instructions.


Other notable tanks
A comic tank idea with a diagram.


Model of the Second World War.

The next model is M-36.

Machine T-40.

Schematic machine MK1.

Another option.

There are also modern models.

Known KV-1.

Making ISU-152.

Model SU-100.


With the proper level of accuracy and care, you can assemble quite realistic cars.
Tank coloring pages
For applications and postcards, children can use coloring pages and templates. I give you a small selection.


Remember, she promised to give a medal with a tank? So here she is.

Create with pleasure with your children, explaining what a great thing our ancestors did, bringing victory to the USSR!
paper tank ideas
And in conclusion, a small selection of ready-made crafts made by yourself. Some do it entirely on their own, while others get help from their parents.
For inspiration, take the idea with the bushings.

Or the square cab idea.

Corrugated paper gift option.


Round tank.


A similar model was made above from green cardboard.

Quick craft idea.


Enthusiastic people create growth crafts from cardboard and even plywood.


How do you like the selection? I am sure that both senior schoolchildren and younger preschoolers will find inspiration here. Also show the ideas to dads, maybe they will also be inspired and help the kids in creating crafts.
tweet
Tell VK
Making various paper crafts has long been a popular activity among parents and their children. It came from Asian countries, where since ancient times people have improved their skills in origami and paper crafts. This kind of activity can be a great workout for both the baby and the parent.
In the early 90s, psychologists and specialists working with children noted the benefits of this type of activity for children. It's great for developing motor skills. and spatial imagination of children. If kids like to tear and crumple paper more, then older children can instill a love for origami folding, which later develops into the creation of unique figures using glue, thread and other secondary materials.
Paper crafts develop imagination. In addition, watching how a simple sheet is transformed into some beautiful model, analyzing the folds of lines and developing in this direction, you can improve your spatial thinking skills, which, of course, will be needed in geometry. There were calculations that claimed a higher percentage of mathematicians among people who were engaged in paper crafts in childhood.
A voluminous homemade cardboard tank - colored and quite realistic - is quite easy to do. And it’s not more difficult to make a wedge combat vehicle - the main thing is to carefully study the pictures depicting the desired model so as not to get confused in the colors and details, and of course, follow our instructions and recommendations step by step.

Very often different models and do-it-yourself instructions for making a paper tank are recommended for boys. Not surprisingly, even from an early age in a boy you can see a young commander who needs an army and equipment for his military strategy. This does not mean that girls cannot create tanks - speaking of this, the child himself can choose the things that interest him. Only interest and curiosity will help create a truly beautiful and unique figurine.
You should start with the simplest model, which will suit many beginners in this field:

The first tank model is ready! It turns out to be small and is unlikely to be able to claim originality or uniqueness, but outwardly it looks very good and the baby will surely like it. And most importantly, this model does not require special skills and is not difficult to perform.
Gallery: paper tank (25 photos)


DIY paper KV-1
It is more difficult to make a model of this tank in rows and takes much more time than a regular one, but the result is guaranteed to be much more beautiful and suitable for the original. On the Internet you can find countless different ready-made models for making this particular paper figurine, but, of course, you can try to assemble and create it yourself. It should be borne in mind that this model requires a huge supply of nerves and patience, attentiveness and accuracy. CV-1 is usually started by people with some experience.

Making paper tanks is not such a difficult task. as it might seem at first glance. Having enough patience and perseverance, you can go beyond the Tiger or KV-1 models, but go for more complex types of tanks. The main thing is to enjoy the process and enjoy each successfully obtained model.
Related publications
-
 Shed greenhouse, pros and cons Shed polycarbonate greenhouse wooden frame
In practice, the construction of capital greenhouses on personal plots can most often be seen as a separate structure. However, with all...
-
 How to make a children's table desk
Like a school desk, which is the main part of the interior of any educational institution. Also, the desk can be usefully implemented at home, namely ...