
Isolate diagrams with your own hands. Isolate for beginners diagrams with numbers flowers step by step. For Beginners: Isothreading Charts

According to the Eastern calendar, each year has its own patron. There are twelve such patrons. The upcoming 2017 will be the year of the red fiery rooster.
Every child from childhood needs to be introduced to the eastern calendar, and by the New Year, together with the baby, you can make a unique picture by engaging in the creative process. One of the types of needlework is thread graphics - isothread. It is also called embroidery on cardboard, thread design. This style is completely uncomplicated, and is often practiced for the development of children's motor skills in kindergartens, in educational circles and art circles. However, you can learn isothread with your own hands, without turning to professionals in this matter. Children will undoubtedly enjoy this kind of art.


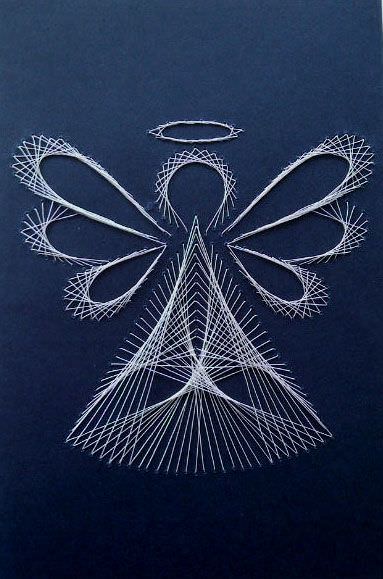
A child can be taught to create amazing pictures and postcards using isothread, which can be presented to friends or relatives. In addition, you can decorate the walls of your own house with such fakes. By the New Year 2017, together with the child, we will try to create a craft with isothread. The main character on a solid basis will be the symbol of this year - the rooster.
Necessary materials
For this purpose you will need:
- solid base, thick cardboard or paper;
- ruler;
- scissors;
- needle;
- woolen thread or floss.
In addition to the above mandatory items, you can use the following elements, which play an important role in the isothing technique:
- a simple pencil that will transfer the image of a rooster to the base;
- a mat or backing that will be used to facilitate piercing the cardboard backing with a needle or awl;
- an awl or a gypsy needle that can pierce a denser base than cardboard;
- "PVA", "Moment" or other high-quality glue.
Scheme
To begin with, the rooster scheme must be transferred to the wrong side of the base. Schemes can be used with numbering. Thus, the work can be significantly simplified, because such a sample is enough to attach to the substrate and carefully fix it. In addition, numbering can give the work accuracy.
Such work as the Rooster is quite simple, but contains elements of embroidery with the technique of filling the arc. The scheme can be created independently or found on the Internet. It is worth remembering that it will be difficult for a beginner to create a high-quality picture for embroidery, so you need to turn to people who have already done similar work before, but you can print the scheme yourself.
The more dots, the more expressive the picture will be.
Selection of materials for work
In order for the rooster in the isothread technique to be especially accurate and unique, it is necessary to pay close attention to the materials from which the creative work with the child will be made. The materials used to create a rooster using the isothread technique are divided into two groups: threads and the basis of the composition.
The most widely used as a material for creative work with isothread is thick cardboard of various colors. The color choice depends on the desire of the child and his parent. It is here that the rooster will be located - the symbol of the year.
The compositions look beautiful against the background of velvet paper, but there are some difficulties here, namely, the need for skills in isothreading technique. In addition, there is another significant disadvantage - this is a high cost, unlike ordinary thick colored cardboard.
Recently it has become popular to use old CDs as the basis for an image made using the isothread technique. Such a substrate is substantially stronger than any type of cardboard. However, in order to pierce holes, it is necessary to resort to tools such as an awl or a gypsy needle. But for a woman, and even more so for a child, this type of activity will be difficult, because physical strength is needed here.
As for the threads, it has been proven that the use of floss is the most optimal choice, because there are good reasons for this. The first is affordability. The second is the availability of material for purchase. The third is a huge color choice, which will make the work more vivid.
The rooster can be made from colored silk threads. Such a choice will certainly please many. Incredibly beautiful works are obtained from such material. For children's creativity, colored threads such as iris may be suitable. It is worth knowing that woolen materials cannot be useful for isothing technology. It's better not to use them. The thing is that in such threads the pile content is exceeded.
In addition to threads, beads and beads can be useful in creating a rooster using the isothread technique. The presence of such decorative elements in the work is not necessary, but they can perfectly complement the creative idea.
Schemes for technique isothread


And lines. Although from a distance you can see the whole pattern: landscape, portrait, flowers. And just approaching the picture, you are surprised at the technique of execution. It seems that the mysterious interweaving of threads is beyond the control of an ordinary person. However, even a schoolboy can master it. Having understood the fundamental foundations of this needlework, you can eventually create real masterpieces.
What is izonit?
This needlework appeared in the 17th century in England. Masters used this pattern as a decoration of houses. Carnations were driven into the boards, threads were wound in a certain sequence, and an unusual element was created. Subsequently, the boards with carnations were replaced with cardboard, velvet paper with holes. And some craftswomen transferred isothread to fabric.
From geometric shapes and lines, magnificent pictures with isothread are obtained. Schemes of simple plots can be found in handicraft books. There is little information on creating complex paintings.
The fact is that there are not so many professionals in this direction, everyone keeps their achievements in secret. In most cases, the isothreading technique, or nitkography, is used in developmental labor lessons with older preschoolers and first-graders. With children, they create small postcards, crafts on disks, simple paintings with one plot.
For this type of creativity, get thin threads. The more colors, the brighter the work will be. You will also need a pencil, a compass, a ruler, an awl, needles of different thicknesses, foam and cardboard.
Pictures with isothread: diagrams of the main elements
Let's start with a circle. Draw a circle, divide it into equal segments. By embroidering chords in a certain sequence, you get a filled or incomplete circle. To remember what distance between the segments and what sequence of embroidery gives a particular pattern, make card templates. They will come in handy when creating your schemes.
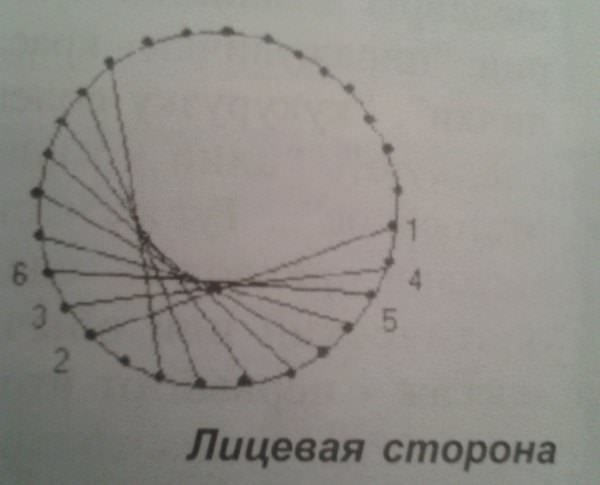
Consider 3 ways to embroider a circle. On the template, you can draw a circle with a compass. In the finished picture, use prepared samples so that there are no unnecessary punctures. Mark 19 points on the circle, number them. Put the template on the foam, pierce the points. You make a drawing and a puncture from the wrong side. Next, insert the thread, make a large knot, drive the needle from the inside to the first point. According to this principle, all work in the technique of izonit goes. Schemes for beginners:
- Embroider each chord so that a large circle forms on the face, there will be small stitches from the inside. That is, from the first point enter into the third. On the wrong side, insert the needle into the second point and go to the fourth. From the wrong side, from the third point, enter the fifth, etc.
Embroider a circle
We continue to consider the main elements of nitkography, from which all pictures are obtained using the isothread technique. Schemes of filled circles:
- "Lengthen" the chord, starting from the first and fifth points. Also, on both sides, consistently walk around the entire circumference. That is, from the fifth point on the wrong side, insert the needle into the second and go to the sixth. In this variation, the inner circle becomes smaller.
- To get a more filled circle, make the chords bigger. For example, from the first point enter the ninth. On the wrong side, insert the needle into the tenth point and bring it out to the second. Then insert the needle at the third point and withdraw at the eleventh. That is, short stitches are formed from the wrong side.
These are simple circles, if you “impose” layers on top of each other with different threads, you will get a multi-layered circle. That is, embroider the third method, then the second and then the first pattern. You can experiment with other geometric shapes. If the points are close to each other, then take a thin needle and get elegant pictures with a thread.

Schemes of triangles and arcs
The pattern depends on the length of the triangles. The number of points must be the same. For example, the distance between the points can be a centimeter from all sides, or on one side the same number of points alternates every five millimeters.
Number the sides of the triangle. Start embroidering by withdrawing the needle from the end of one edge and inserting it into a point from the corner of the other side. For example, from the first point of edge A along the front side, go to the second point of edge B. From the wrong side of B, make a small stitch to the third point. On the front side, enter the fourth, etc.
Triangles make interesting pictures. Izonit with schemes of complex circles consisting of triangles allows you to get beautiful abstract balls. Only in this case, number all three sides of the figure. Study carefully the pattern of embroidery balls. In one version, the triangles are fully embroidered, while in the other they form petals. The arcs are numbered twice, starting from the second point. Combine figures, get unusual plots.

Rooster with isothread
For embroidery, simple coloring patterns are suitable. Print out the picture, divide each element into dots, number, embroider. To make it easier to choose a pattern, scroll through the needlework patterns (meaning isothread). Schemes of pictures with numbers will confuse beginners. Therefore, sew one piece at a time.
For example, you embroider a scallop divided into three parts on a rooster. Create them like triangles from a complex circle. Next, move on to the beak. Now pay attention to the eye. First, embroider the head in a circle, and on top of this type create an eye. The remaining parts are embroidered in the same way as a circle or an oval.
When filling in the shapes, pay attention to the middle, which, due to the “thickness” of the weaves, creates a direction. Therefore, you embroider the crest, tail from the top, but create the wings, the body from the bottom. You embroider the paws with a “triangle”, and finish the lower leg by connecting both parts. In this technique, for postcards, take bright multi-colored threads, and for a picture - several shades of the same color scheme.

Flowers
Isothread is also used for postcards and bookmarks. You will not find schemes of paintings (flowers, animals, landscapes, architecture) on the Internet. Masters create complex plots on their own. Beginners should practice on "children's" subjects, so that later they can be depicted in other proportions.
For example, a single rose is suitable for a postcard, and by combining a bouquet, we get a mini-picture. First, embroider the rose strictly according to the scheme, and then experiment with the size of the details and technique.
Petals, thorns, sepals are embroidered like corners, leaves like ovals, stems and some lines are made with a simple “back with a needle” stitch. Some masters first draw a background with the colors of plants, then the pattern complements the background. Others work with technology, embroidering thin lines tightly together.
To make sunflowers, embroider the middle with a “lattice”, petals and leaves with arcs. In this case, divide the sheet into four corners to emphasize its width. Using several shades of the same color, you can reflect the shady and sunny areas of the flower.

Animal world
Monochrome is a classic of any needlework. It is no exception and paintings can be borrowed from cross-stitch. cardboard, from the wrong side, draw a swan floating on the water. Draw the waves. Now divide the bird into parts. You can immediately draw shapes of different sizes to fill the bird completely. Then on a black background you get a white swan. The smaller the figures are embroidered, the more accurately the embroidery is obtained.

Here's a little advice if the diagrams were not found, and the finished picture is incomprehensible. Print the plot on a color printer, pick up the threads. Glue the pattern from the inside, embroider from the background. If finances allow, make a finished print on canvas.
In many animals, most of the details are filled with ordinary stitches. For example, a cow's ears, tail, legs, udder are made with strokes. The torso, head, eyes, nose, muzzle - are embroidered according to the type of circle. At the same time, make the eyes and nose on top of the embroidered muzzle. Embroider horns like arcs.
Varieties of work
Nowadays, masters represent different ways to isolate. Schemes of paintings are described by professionals in books. Pictures are not only embroidered on cardboard, but also return to old traditions. A beautiful fabric is stretched onto the board, a diagram is attached, and decorative nails are driven in point by point. The paper is removed, and threads are wound around the cloves. In this case, pictures from different sides create a new image.

Even if you use the isothread technique to connect two circles held on four pillars, you will get an unusual hourglass. In this variant, use shiny ones. The interweaving of geometric shapes is used to create flowers and in dumbbells. Only wire is used instead of nails and warps.
When creating complex paintings on cardboard, place the dots next to each other. Take beaded needles. It will take a long time to embroider, but the plot will be realistic. And many more professionals create their own patterns. First, they draw a sketch on paper, put dots, draw lines, numbering them. Then embroider the resulting pattern and look at the result.

Brief conclusions
If the embroidery on the canvas seems complicated, then master the isothread (diagrams for beginners). You will not find paintings with a complex pattern describing the manufacturing technology. But as soon as you master the embroidery of the main elements, you will be able to “divide” the works of masters and even ordinary photos into shapes. Try your hand at new needlework and delight others with your work.
The isothreading technique is simple and interesting, it is able to fall in love with both adults and children. Schemes for creating isothread with numbers are extremely simple even for younger students, but at the same time they are very beautiful and varied in their subject matter for adults. In our article you will find color schemes with numbers using the isothing technique and schemes with numbers that are designed for children. You can also print the schemes prepared for you for free for every taste and for any occasion.
The isothreading technique is very beautiful and varied, but, like any needlework technique, it has a number of rules:
- Do not make knots, fasten the corners of the thread with tape or glue on the wrong side.
- Marking must be done on the wrong side of the product
- Make holes with a thin needle from the inside. If the embroidery means you have a thick thread, then make a thick hole on the front side.
- When making a small pattern, use a sharp needle and fine thread
- The smaller the markup, the more refined the pattern.
- The segments must be the same, follow the markings
- Prepare your cheat sheets, the finished pattern will be much better and easier to see
- The pattern is best done on plain paper, then attach it to the prepared material and pierce holes.
- Do not use wool thread for embroidery. They do not have the necessary brilliance and beauty. The drawing will look faded. Shiny threads are best for working with the isothreading technique.
- At the beginning and at the end of work, fasten the thread especially tightly. If you need to add a piece of thread, secure it with tape from the wrong side of the product.
- If the thread is tangled, try to unravel, do not make knots. Just try to measure the desired length of thread. Too long a thread is very inconvenient to work with.
- At the end of the work, try to hide the wrong side of the product. If you did on cardboard, hide the large size of the cardboard. If this is a small postcard, you can seal it with white paper.
Having studied the techniques of isothread, and having completed several shapes, you can create your own patterns for the image you like.
We study isothread schemes for children with numbers: we teach children how to perform
The isothreading technique is so simple that both children of older kindergarten groups and children of primary school classes can do it. After teaching a child several elements of embroidery and having received an interesting picture, the child is able to perform the technique more skillfully than an adult! The only “but”: the schemes must be prepared by an adult. With a prepared and numbered scheme for children with numbers, the child can be given not a sharp needle, but an embroidery needle with a blunt end.
This technique can serve as an excellent help in preparing for school, it causes perseverance, interest, and with proper help and attention from an adult, it will develop the main qualities of the child, such as “I can” and “I did it myself (a)”. For high school students, this technique is perfect as valentines, greeting cards to friends and teachers. Also, this technique helps to develop the child's motor skills, needle handling, abstract thinking, and the ability to concentrate. Soon the child will begin to come up with new patterns for embroidery, which will be unexpectedly joyful for parents and important for the child.

Any picture you like can be turned into the art of embroidering with isothread - broken into circles and corners, pick up the colors you want and proceed to execution. Make art with kids!
A step-by-step master class on creating beautiful flowers with your own hands
In our master class you will find color schemes with numbers using the isothing technique, learn how to perform simple and more complex elements, as well as get acquainted with the technique of making other various products. Also here you can find free schemes suitable for you.
Scheme - an explanation for the execution of the flower. We embroider the flower in steps 1 - 10, the petals in steps 1 - 10 and 1 - 13. We sew beads on the places marked in green. The leaves are also embroidered 1 - 10, 1 - 14 and 1 - 12. The stem of the flower is embroidered in steps 1 - 4.
Scheme for transferring to the wrong side of the material:

Scheme - explanation. In place of the yellow dots, we use beads or beads. Embroider flower petals in steps 1 - 10, embroider stems in steps 1 - 3.
Transfer scheme:

Scheme - explanation. We embroider the flowers in steps 1 - 14, 1 - 15, 1 - 16. We embroider the leaves, starting from the point marked in green. We embroider the stems in steps 1 - 3.

Scheme - explanation. We embroider the middle of the flower in steps 1 - 10, sew beads along the contour marked in yellow. We embroider leaves in steps 1 - 10. Stems, in steps 1 - 3.
Scheme for transfer to embroidery:

Bell

Lotus

Thistle is made according to the principle of embroidering an arc with triangles. This type of technique is used when you need to flash a picture in a fan-like manner. Blooming flowers have thickenings, which are performed by the oval filling technique, just like buds. To perform a thistle, not complete filling is required, but only until the contour closes. The stems are made with regular stitches, and the leaves with the corner filling technique. All elements are made with green threads, except for the thistle flowers - they are made with purple threads.
Dandelion

If you perform a flower as in this diagram in a semicircle, then its filling should be done, as in a thistle, with triangles. If you decide to add round flowers, then they should be done with simple stitches. The length of these stitches should be equal to the diameter of the circle. Leaves are made according to the technique of making an angle. The angle can be any.
Video on the topic of the article
Quite unusual is needlework, which involves the creation of paintings using threads on a solid basis. For beginners, we note that this needlework is called isothread, or thread graphics. This type of art first appeared in England. This method of weaving threads was invented by English weavers. They drove nails into the boards, and in a certain sequence they pulled threads on them. As a result, openwork lace products were obtained, which became the decoration of the house.
Embroidery with threads on cardboard or paper is an easy task even for beginner embroiderers, special attention is now being paid. For this needlework, the presence of a scheme is mandatory. Such schemes are available in our lesson. With the help of techniques, a gift card or a picture can be made, or you may want to decorate your own home with work. A picture or a postcard will surely please your relatives and friends.


We bring to your attention a master class for beginners, in which we will try to learn how to work with embroidery on paper. This will require:
- scissors;
- needle;
- pin;
- paperclips;
- foam rubber;
- scotch;
- cardboard;
- threads (any).
Embroidery on paper or cardboard is akin to drawing with threads on a solid basis. We choose the cardboard according to the size of the picture, and we will definitely take care of the availability of a scheme for work. For beginners, we explain that embroidery with threads of figures is performed on pierced points.
And now for training, we will perform the necessary exercises. Embroidery with threads on a solid basis begins with the fact that a small piece of cardboard must be placed on the foam rubber. We arbitrarily pierce six points with a pin, and determine the wrong side of the cardboard, on which there are tubercles from the puncture. The front side remains smooth.
Straight line embroidery with threads on paper
Our master class is for beginners. Note that embroidery with threads on cardboard or paper is based on a simple straight line. Let's start with the simplest, and embroider a line on paper. In our case, the line is two points connected by a thread. For embroidery with threads on cardboard, it is advisable to take ready-made drawings in the form of dots. And we will make two points that do not have a number, so embroidery can start with any. We take cardboard, to the front side of which we apply a pattern in the form of dots, and fix it with paper clips.


We put it all on the foam rubber, pierce the marked points with a pin. Raise the cardboard and look at the punctured places. After that, remove the paper clips, put the thread in the needle and start sewing. We remove the needle and thread from the wrong side, fixing the tip of the thread with tape. And now we bring the needle and thread from the front side to the wrong side, fix it with tape and cut off the thread. We tighten the thread so that the pattern does not sag on the front side.
Mushroom embroidery with threads on paper
Having explained the primary material for beginners to study thread graphics, you can complicate the schemes and try to embroider a mushroom. It follows from the diagram of the mushroom that there are many lines there, and there are no numbers at the points. Therefore, we can embroider a mushroom from any point, and the lines will tell us which one to which to connect. Let's start embroidering from top to bottom. We introduce the thread into a point (hole) from the wrong side, fix the end with adhesive tape and embroider the first line. Then, on the wrong side, we insert the needle into a point adjacent to the exit of the thread. On the front side, we introduce the thread to the opposite point, embroidering a line.
We continue this technique until we finish the work, or until the thread runs out. If the thread is over, then fix it with tape and cut off the excess. We start a new thread in the next hole, and continue to embroider.
The main and basic elements of thread graphics
The basis of thread graphics are three elements:
- corner filling;
- circle filling;
- arc filling.
Having mastered the three basic elements, you will be able to embroider any picture with thread graphics, even the most complex ones, and thread embroidery on paper will become understandable and accessible to you.
Filling a corner when embroidering with threads on cardboard or paper
Let's draw an angle with a pencil on cardboard, and mark the lines of the angle through the same distance. For training, the distance for marking is chosen approximately one centimeter. In the future, you need to know that the smaller the markup, the more beautiful the embroidery, for fine markup, choose a thin needle and thread. For our lesson, the threads can be thicker, but their brand and type do not matter. After marking, we make punctures of the cardboard at the marked points. We make the holes small, otherwise they will be very noticeable on paper.
 We will begin to embroider from the last point of one of the lines of the corner, bringing the thread from the inside to the front side. Then we insert the needle into the first point of the opposite line, turn the cardboard inside out and insert the thread into the next point from the thread. Now we bring the thread to the front side and send it to the opposite line, to the penultimate hole. We turn the work over again, and go to the next upper point. We bring the thread to the front side and cross the corner, passing to the third point from the top.
 We continue the work on filling the corner in the same technique until the very end. To complete the corner from the last lower point, we must pass the thread to the upper one, and then from this upper point, transfer the thread to the lower hole of the opposite line. Now filling the corner is completely finished. Let's add to what has already been said that the angle can be acute, obtuse or even deployed. By connecting different angles together, you can get very beautiful and diverse shapes.

Filling the circle
Draw a circle with a pencil, and make markings on it. We carefully monitor that the marking on the circle is carried out strictly through the same segments. The beauty of embroidery on cardboard depends on this, and this is the meaning of the scheme of our work. We bring the needle and thread from the wrong side of the work to the face, from any marked point. We cross the circle in diameter, and send the thread to the intersection, going to the wrong side of the work. Now we start the needle at a neighboring point, we go out with a thread on the face of the work, and again we cross the circle in diameter. We always move in the same direction.
 The more holes we make when marking, the denser the threads lie, and the greater the filling of the circle. I would like to note one more feature of filling the circle. The fact is that it can be done not only along the line of the diameter of the circle, but also along the chord. Getting started is the same as in the first case. A circle blank is made, and holes are pierced on it at the same distance. The needle is held at any point from the wrong side and displayed on the face. And now we draw the thread not along the diameter of the circle, but through one point from it (for example). You can choose any distance.
 We bring it to the wrong side of the work, and stick the needle into the nearest hole. Then again we bring the needle to the front side, and we perform the same chord as the first one. It is necessary to count the number of points between the beginning and end of the first chord, and observe this gap throughout the work, embroidering each line. Such embroidery is not like filling a circle along the diameter line. The first difference is that some points have to be pierced twice instead of once. In addition, another smaller circle is formed in the center of the circle. This second circle is not filled with threads.
Video: Learning thread graphics
We embroider a rose with isothread technique
What can be embroidered with threads on cardboard or paper? Considering the finished works made using the technique of thread graphics, we note a huge variety of objects and themes that are embroidered on them. These are landscapes and flowers, figures of people and magnificent temples. But today we will tell for beginner embroiderers how to embroider a simple rose using the techniques of thread graphics. To do this, you need to learn how to perform simple arcs from which a rose flower will be made.
An arc can consist of an even or odd number of points. We take for example 14 and 13 points. Let's draw an arc on the cardboard, and pierce the dots on it. You can embroider an arc from any side, from the first point. We embroider an arc in the circle algorithm. We can do this by skipping one point and getting the thinnest arc. In our case, you can draw lines through a maximum of six points. The more points we skip, the wider the arc will be.
There are no numbers in the rose drawing, there are an even and odd number of dots on the arcs. Decide for yourself how many points you will fill each arc. By learning how to embroider roses, you will be able to make greeting cards. Any postcard will be a great gift for family and friends. All explanations for embroidering roses are available in one of the videos that is attached to the lesson. There you will also find a rose pattern for your embroidery.
Isothread embroidery schemes


Such a technique of arts and crafts as working with isothread has two easy-to-perform techniques: mastering embroidery on geometric shapes - a circle and an angle. Thanks to the wide imagination and irrepressible fantasy of two figures, you can come up with masterpieces worthy of the showroom. Paintings created using the streak technique are an unusual gift for a loved one, an excellent addition to the interior style and just a good mood on a dull day.
Paintings created using the technique of isothreading are an unusual gift for a loved one.
In practice, there are two types of scheme.
For circle
- On a sheet of thick cardboard, select the starting point - the center of the circle. Draw a circle with a compass. To determine the equal distance between future holes, we use a protractor. On the circle we make an equal number of holes according to the markings.
- We conditionally number clockwise from 1 to 16 without skipping holes. Following the instructions, skip the thread in sequence: from wrong side 1 to 3, return on the wrong side to 2, from 2 to 4, back to 3, from 3 to 5 and so on until the end of the circle. The pattern is good for embroidering the contour of curly images. In order to create an arc with the base, use a semicircle.
- The next pattern is obtained with long stitches, it is convenient when making ovals in the pattern. From designation 1 we count seven punctures, on the front side we make a stitch in the eighth. From the wrong side we go to the seventh and the front one goes back before the designation 1. The movement of the thread is counterclockwise. The ornament is ideal for embroidering a New Year's snowman, decorative elements in the images of animals, butterfly wings and bows.
- Now we make the same pattern with long stitches with a distance of five punctures. The center circle will be slightly larger, which makes it possible to make an internal ornament with stitches "through one" or obliquely.
For Angle
- We draw an angle of arbitrary shape on thick cardboard from the inside. On both sides of the figure, mark the same number of points at an equal distance. Pierce the markings with a pin, 5 punctures on each side.
- We number the points on one side from above - down from 1 to 5, on the other from below - up from 6 to 10, respectively.
- Filling out the schema. From point 1, stretch the thread to 6, along the purl to 7, from it the front thread to 2. Then down 3 and along the outer 8. Complete the pattern by fastening the end of the thread with a sketch from the purl 10.

Gallery: isolate (25 photos)


How to embroider a circle with isothread: master class
Making a circle with isothread requires concentration and a sequence of actions.
Necessary:
- A sheet of thick cardboard;
- Threads of iris, floss;
- Compass, needle, awl;
- Scissors, glue, protractor.
How to do:
- Turn the cardboard over to the wrong side, draw a circle in the center with a compass. Using a protractor, accurately distribute the points around the circle with a pencil, taking the degree ruler as a basis. For example, every 10 degrees we put a designation.
- Carefully pierce the places of designations with an awl. Place a cloth or piece of wood under the cardboard to prevent damage to the work surface. To make the holes smaller, you can use a needle.
- Now mentally imagine a clock face. Where the number 12 should be, put the number 1 above the puncture, then clockwise number all the holes with numbers.
- Start work with the designation 1. From the wrong side of the paper, through the number 1, we stretch the needle and thread up to 5 from the front side. Then to 6 wrong side up to 2. Observing the digital order, from the wrong side, a circular seam is obtained, from the front side - a circular pattern like a multifaceted star.
- You can’t tie knots, pulling together, the thread deforms and spoils the image of the picture. Fasten the ends of the thread with glue.
There are options for other circle patterns:
- Stitch equal to the diameter: Inside the figure, measure the center, put a point. Poke a hole from the inside with an awl. Then, from purl 1 along the front to the center point, stretch the thread, return to purl 2, from it along the front to the center and again return to the bottom by 3.
- Equal length stitches: Mentally divide the circle into a clock face. Where the number 12 should be, we retreat on the wrong side to 11, from it the front thread to 5, on the wrong side from 5 to 4, from 4 front up to 10.
It is very important not to stray from the sequence of designations, before making a seam, consider the location of further numbers.
Isothread embroidery on nails for preschoolers step by step: how it is
Such crafts look spectacular, creating visual volume by raising the thread above the surface of the base.
You will need:
- Small carnations with hats;
- floss threads;
- Wooden board or plywood sheet;
- Drawing template, hammer.
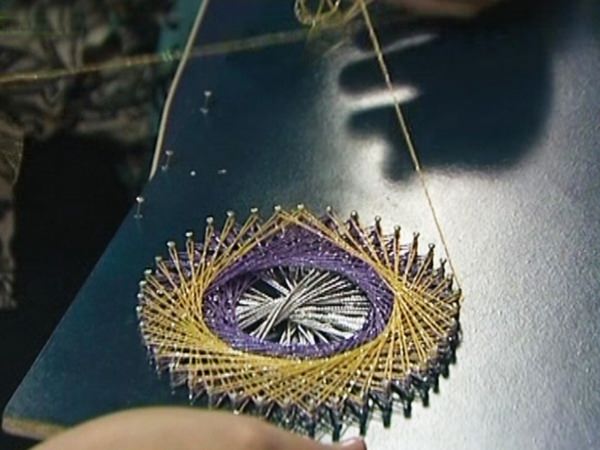
Such crafts look spectacular, creating visual volume by raising the thread above the surface of the base.
How to do:
- Having chosen a drawing for a future masterpiece (print new schemes), fix it with a strip of tape on the work surface.
- To maintain the exact distance between the nails, use a pencil to mark the base. Drive in nails at the points of the contour borders. Remove drawing.
- At the end of the thread, form a loop, throw it over the nail of the first corner, scroll around the mount. Then stretch diagonally to the opposite carnation. The technique of isothread on nails allows you to form a pattern both in a certain sequence of applying a thread, and in a chaotic manner.
- Perform the work clockwise, without violating the order of the threads.
At the end of the execution, fix the end of the thread with glue.
Isothread: star for children
You will need:
- A sheet of thick paper;
- Threads of iris or floss;
- Pencil, ruler;
- Needle, awl.
What to do:
- Draw a symmetrical star on the wrong side of the sheet. For the initial basis of the drawing, we take the upper ray of the star. The vertex point of the beam will be conventionally denoted by the letter A. From the designation down the sides of the corner, count an even number of points. For example, five on each side, for a total of ten. We denote them by numbers from left to right.
- Make holes with an awl at the point designation. I got a diagram of the drawing.
- From the inside of point 9, stretch the thread to the top of A. then return from A to point 2 and down to point 7. Accordingly, from 7 to 5 we move on the wrong side, on the front side from 5 to 4. From 4 to 6 down the wrong side. From 6 to 3 on the front, from 3 to 1 on the wrong side and up to 8. From 8 to 10 and to top A. According to this scheme, gradually make all the rays of the star.
- After finishing the embroidery of the corners, you can come up with an original image in the middle of the star. For example, here we use the technique of embroidery of equal stitch length.
Just keep in mind the obligatory nuance - in order to prevent mixing of graphic styles of the drawing, it would be more expedient to make some deviation from the punctured holes of the original image.
How to make a snowflake isothread
The snowflake pattern will be very easy for inquisitive and restless needlewomen.
The thread graphic of the image is a circle or square, from the middle along the edges covered with a thread. Here the size of the seam can be varied, for example, one can be made larger, that is, outside the figure, the next seam is smaller, respectively, not reaching the edges of the image.
At the beginning of work on a snowflake, the kid will need the help of adults. Draw a square on a piece of paper with a center point O inside. From it we measure the same distance segments to the edge of the figure and beyond, alternating through one. In the marked places, we put the designations from 1 to 10. From 1 we pull the thread to O, then from O to 2, from 2 to 3 and back to the center point. If you follow the sequence of the pattern, the picture turns out a small snowflake. After finishing the drawing, with light movements, erase the shape of the square with an eraser.

The snowflake pattern will be very easy for inquisitive and restless needlewomen.
The second option for embroidering a snowflake involves sheathing the contours of the pattern with a stitch “through one” (1-3,2-4). Inside the contours, you can decorate the image with beads or sequins, weaving them into stitches.
The idea of executing a snowflake according to the principle of corner embroidery is more complex. You will need:
- Cardboard or velvet paper;
- Scheme of an octagonal snowflake (from the Internet);
- Colored threads of wool, acrylic, iris;
- Pin, needle, tape, paper clips.
How to do:
- Fasten the pattern to the cardboard with paper clips, pierce holes in the image with a pin.
- We conditionally number the corner of the snowflake, the number one is the end of the segment from the beginning of the corner, then down to the beginning of the corner. The other side of the number is from bottom to top, for convenience we denote from 9 to 1.
- We make the first seam from the inside 1, fixing the tail with tape. From 1 we go down the thread to 9, return to 8 on the same side and to 2 on the next side of the corner. Fill in the corner consistently, without violating the order of imposing threads.
- Follow this principle to complete the remaining corners of the snowflake.
monkey thread
To make an image of a monkey, you need:
- Threads for embroidery or floss, iris of appropriate shades;
- Colored cardboard (green under the lawn), a sheet of thick paper;
- Needle, scissors, glue, pencil, pin.
How to do:
- For the picture, you need to take a drawing of a monkey. You can copy it through a carbon paper from a coloring book or find it on the Internet.
- To make the picture have a wrong side, copy the figure of the monkey through the glass. Transfer the inverted image through carbon paper to the wrong side of the background cardboard.
- Pierce the contours of the figure with a pin.
- The tummy, the inner parts of the paws, the ears are embroidered with yellow thread as a circle. We sew the contours of the pattern in brown with threads with a stitch “through one”. The peculiarity of such a stitch is that the distance between its beginning and end is one puncture. That is, if we conditionally divide the punctures into numbering, we get the stitch length 2-4, skip 3, skip 5-7, skip 6. In the second round, we capture the missed holes, skipping already 2, 4, 5, 7, respectively.
- Nose, eyes are embroidered with black thread.
You can add decorative elements to the picture, for example, embroider a ball next to the monkey with beads or make eyes in the form of black buttons.
Related publications
-
 Shed greenhouse, pros and cons Shed polycarbonate greenhouse wooden frame
In practice, the construction of capital greenhouses on personal plots can most often be seen as a separate structure. However, with all...
-
 How to make a children's table desk
Like a school desk, which is the main part of the interior of any educational institution. Also, the desk can be usefully implemented at home, namely ...